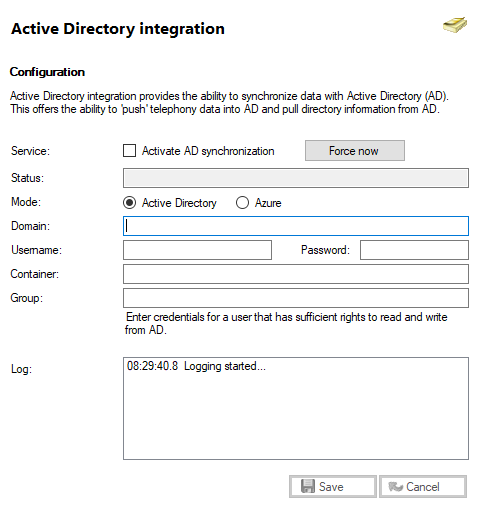
Services -> Active Directory (AD)
WARNING: Fetching data from Active directory will remove or overwrite the existing users' data in the Xchange Server or, if you set integration to Send data, it will remove or overwrite the data within the Active Directory to match the records in the Xchange Server.
- REVIEW which approach you want to take before carrying out this integration. Remember, synchronization can occur in either direction but only in one direction at a time.
- Don't forget to activate Active directory integration for existing users if you want to copy their existing settings to Active Directory or you want to update their settings from Active Directory (this will also avoid creating duplicate users). Although the direction of synchronization can be set by user, for ease of administration it is strongly advised that the same direction is set for each user. The setting can be edited for all users simultaneously by highlighting all users in the "Users" option under the "Enterprise" tab and selecting Edit. We strongly advise that data is always added or modified from either the Xchange Server or Active Directory. That is, choose a master database.
- The number of Xchange Active Directory licenses must be as many licenses as Active Directory users, or as many licenses as Active Directory users within the Organizational Unit specified in the configuration parameters.

Activate AD synchronization/Force now button

Check this box to enable the integration and then fill in the boxes below.
Status

This tells you whether the service is online or offline.
Mode options

Select "Active Directory" for a site with on-premise Active Directory. Select "Azure" if your Network User base is located and administered online. Please request the notes on how to configure Azure from your supplier.
AD domain

The local Domain Name should be entered into this box.
Username / Password

Enter the Username and Password of the account into these text boxes.
Container

"Container" (optional) is used to help categorize users from particular departments set as a container in the Active Directory.
group

"Group" (optional) is used to further help categorize what users are available from Active Directory.
Configuring Active Directory integration permits the synchronization of data with Microsoft Active Directory (AD) so that a user's name and associated telephony and department data can be 'pushed' into AD or 'pulled' from AD. The following fields are mapped between Xchange PC Client and AD:
- (AD) Display name -> (Xchange) Name
- (AD) Department -> (Xchange) Department
- (AD) Telephone number -> (Xchange) Deskphone field
- (AD) Telephone number other -> (Xchange) DID field
Xchange automatically picks the shorter number as the Deskphone number and the longer number as the DID number. If only one number is set Xchange checks if the number is longer than 6 digits; if it is, it will populate it in the DID field or, if not, will populate it in the Deskphone field.
- (AD) Mobile -> (Xchange) Mobile extension field
- (AD) Mobile other -> (Xchange) Mobile field
Xchange automatically picks the shorter number as the Mobile extension and the longer number as the Mobile number. If only one number is set Xchange checks if the number is longer than 6 digits; if it is, it will populate it in the Mobile number field or, if not, will populate it in the Mobile extension field.
- (AD) IP phone -> (Xchange) Softphone field
- (AD) IP phone other -> (Xchange) Home field
To configure the AD integration, enter the name or IP address of the AD server into the 'AD Domain' text box and enter the credentials for a user that has sufficient rights to read from and write to AD into the 'Username' and 'Password' text boxes.
Any changes made to the users on the Xchange Server (assuming that the integration is set to 'Send data to AD') will take effect immediately. Any changes made to the users on the AD Server (assuming that the integration is set to 'Fetch data from AD') may take up to one hour to update the records on the Xchange Server. To avoid this delay, click the "Force now" button within the Active Directory Integration tab.

 Report this page